 Tweet
Tweet
Replacing the alternator on a 2001 Volvo S60 T5 is an easy-to-moderate level DIY that takes about 1-2 hours to complete. There are a few different variations of alternators so check FCPEURO.COM to ensure you’re getting the right one.
 Parts & Tools You’ll Need:
Start by heading to the trunk to disconnect the battery. Lift up the spare tire cover and locate the battery compartment on the left. Remove the 2 nuts and 1 bolt with a 13mm socket and take off the bracket securing the battery:

Lift off the battery cover and carefully disconnect the battery terminals by starting with the negative terminal first on the right. Place it off to the side then disconnect the positive terminal and place that to the side as well so it doesn’t contact the battery terminals:

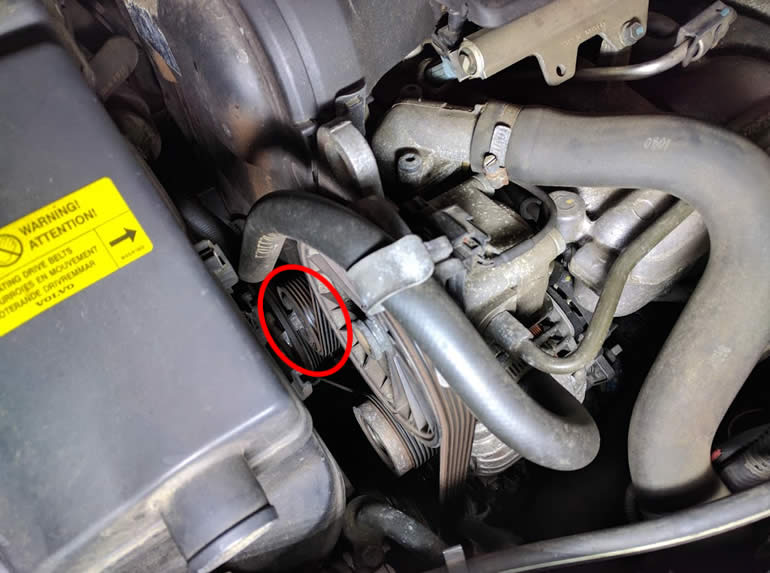
Head to the front of the car, raise the engine hood and start with the serpentine belt:

Locate the belt tensioner:
Unhook this power steering hose so you can work around it as needed:

Attach the belt tensioner tool and rotate clockwise to relieve tension and remove the belt from the car. Note the routing of the belt first so you won’t get confused during reassembly. Also note that your tensioner may have a different tension release point: mine needed a 14mm socket but there’s another that requires a Torx T-55 bit. This is why I listed both in the tools list above and why I didn’t specifically list the bit needed in the picture:

Remove the air pipe above the engine by removing 2 Torx bolts, loosening 2 clamps at both ends and disengaging a routed wire in the back near the firewall.
Note the additional hose attachment on the upper Torx bolt that you’ll need to re-attach later.

Loosen this hose clamp and remove the bottom tube:

Remove the oil dipstick, or else you may break off the handle like I accidentally did:

Disconnect fan connections, cut off zip ties, remove 2 bolts and carefully pull out the fan shroud:

Remove 3 bolts (through the pulley) which secure the power steering pump:

Detach the harness and move the power steering pump as best you can off to the side to make some room below for the alternator (don’t disconnect the hose or tube):

Disconnect the power terminal and pull off the spade connector from the back of the alternator:

Remove the lower alternator bolts and loosen the lower a/c compressor bolts:

Remove the alternator’s upper bolt that’s recessed on the belt side:

Carefully route the alternator against the engine side to avoid hitting the radiator and lift out from the driver side:

Compare the old alternator with the new one. There’s a small design difference but the new one fits just fine:

Installation is the reverse of removal:
After routing in the new alternator into position, I found it easier to start threading in the top bolt so that the bottom bolts thread in easier. It’s a bit tricky so take your time and keep moving the alternator until the top bolt starts to thread in.
All other steps are the reverse of the removal steps indicated above. Hand tighten clamps and bolts, use new zip ties and ensure all the harness connections are back together.
Now enjoy years of trouble-free alternator reliability!
Parts & Tools You’ll Need:- 140 amp alternator
- Sockets, ratchet
- Wrenches
- Torx bit set
- Volvo belt tensioner tool (or a short Torx T-60 bit)
- Zip ties
- Flashlight (optional)
- About 1-2 hours of free time
Start by heading to the trunk to disconnect the battery. Lift up the spare tire cover and locate the battery compartment on the left. Remove the 2 nuts and 1 bolt with a 13mm socket and take off the bracket securing the battery:
Lift off the battery cover and carefully disconnect the battery terminals by starting with the negative terminal first on the right. Place it off to the side then disconnect the positive terminal and place that to the side as well so it doesn’t contact the battery terminals:
Head to the front of the car, raise the engine hood and start with the serpentine belt:
Locate the belt tensioner:
Unhook this power steering hose so you can work around it as needed:
Attach the belt tensioner tool and rotate clockwise to relieve tension and remove the belt from the car. Note the routing of the belt first so you won’t get confused during reassembly. Also note that your tensioner may have a different tension release point: mine needed a 14mm socket but there’s another that requires a Torx T-55 bit. This is why I listed both in the tools list above and why I didn’t specifically list the bit needed in the picture:
Remove the air pipe above the engine by removing 2 Torx bolts, loosening 2 clamps at both ends and disengaging a routed wire in the back near the firewall.
Note the additional hose attachment on the upper Torx bolt that you’ll need to re-attach later.
Loosen this hose clamp and remove the bottom tube:
Remove the oil dipstick, or else you may break off the handle like I accidentally did:
Disconnect fan connections, cut off zip ties, remove 2 bolts and carefully pull out the fan shroud:
Remove 3 bolts (through the pulley) which secure the power steering pump:
Detach the harness and move the power steering pump as best you can off to the side to make some room below for the alternator (don’t disconnect the hose or tube):
Disconnect the power terminal and pull off the spade connector from the back of the alternator:
Remove the lower alternator bolts and loosen the lower a/c compressor bolts:
Remove the alternator’s upper bolt that’s recessed on the belt side:
Carefully route the alternator against the engine side to avoid hitting the radiator and lift out from the driver side:
Compare the old alternator with the new one. There’s a small design difference but the new one fits just fine:
Installation is the reverse of removal:
After routing in the new alternator into position, I found it easier to start threading in the top bolt so that the bottom bolts thread in easier. It’s a bit tricky so take your time and keep moving the alternator until the top bolt starts to thread in.
All other steps are the reverse of the removal steps indicated above. Hand tighten clamps and bolts, use new zip ties and ensure all the harness connections are back together.
Now enjoy years of trouble-free alternator reliability!